Patch pockets can be square, rectangular, curved, or even gathered. They are one of the most noticeable signs of a garment’s quality, so take care to position them correctly and make sure they are level. Pockets used in pairs must be the same size and shape.
PATCH POCKET WITH SQUARE CORNERS
This type of patch pocket is basically a piece of fabric with the top portion (the pocket facing) and seam allowances turned to the wrong side—but to make it neat, precise, and square, the two lower corners should be mitered.
1. Finish the top edge of the pocket facing. Turn the pocket facing to the right side along the foldline. Pin, baste, and machine stitch the top facing in place from the fold to the finished edge on each side, along the seamline, which is often 5⁄8in (1.5cm) in from the raw edge. Reverse stitch at each end of each seam to secure. Trim across the top corners to reduce bulk.
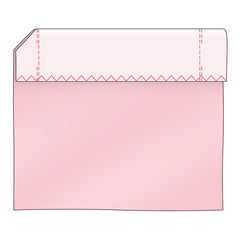
2. Turn the facing to the wrong side of the pocket, and gently push out the corners with the help of a small pair of scissors; press flat. Press the seam allowances to the wrong side of the pocket down the sides and across the lower edge. To miter the lower corners, open out the seam allowances at these corners and then fold them diagonally across the corners, so that the pressed foldlines match. Press the diagonal folds, then trim off the points, leaving a ¼ in (6mm) seam allowance.

3. Baste the top facing and seam allowances in place. If desired, machine stitch the top facing about 3⁄8in (1cm) above the finished edge.

PATCH POCKET WITH ROUNDED CORNERS
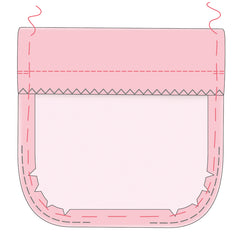
If the lower edges of a patch pocket are rounded, then you will find that there is extra fullness in the seam allowance when it is pressed to the wrong side. This fullness must be removed, so that there is no overlapping of fabric to cause bulk.
1. Follow step 1 of Patch Pocket with Square Corners. Then, on the right side of the fabric, make a row of ease stitching by setting your machine to the longest stitch length possible and stitching around each lower corner, just inside the seam allowance. Trim all the pocket seam allowances down to 3⁄8in (1cm).

2. Turn the facing to the wrong side of the pocket, carefully push out the corners with a small pair of scissors, and press flat. Gently pull up the ease stitching at each lower corner to gather the pocket into a curved shape.

3. Press the pocket’s 3⁄8in (1cm) seam allowances to the wrong side, snipping notches into the seam allowances around the curves to reduce bulk, but taking care not to snip through the ease stitching. Baste the top facing and seam allowances in place. If desired, machine stitch the top facing about 3⁄8in (1cm) above the finished edge.
MARKING POCKET POSITIONS
Pocket positions are normally printed on the pattern pieces. For a patch pocket with square corners, you can simply mark the four corners and then line your pocket up with the marks. The quickest way to do this is to use a chalk pencil and make a dot on the right side of your fabric at each corner.
For patch pockets with rounded corners, you can mark the top corners as for straight corners, but then trace the lower curved edge onto the right side of your fabric, using a tracing wheel and dressmaker’s carbon paper.
APPLYING PATCH POCKETS
Patch pockets can be applied by hand or machine, but the preferred method is by machine. Not only is machining a pocket in place quicker, but it also makes it stronger and more secure. However, you must ensure that your stitching is neat and precise.

After transferring the pocket position onto the right side of your garment, place the pocket on top; pin and baste it in place. Set your sewing machine to a medium-length stitch, and sew the pocket in place along the side and bottom edges, topstitching close to the pocket edge. Remove all basting stitches.
For more pocket techniques like reinforcing corners and sewing in-seam pockets, as well as techniques and tips for sewing seams, hems, pleats and more, check out Sewing Know-How.
To get more fab blog posts like this one - direct to your inbox - be sure to sign up to our mailing list here.