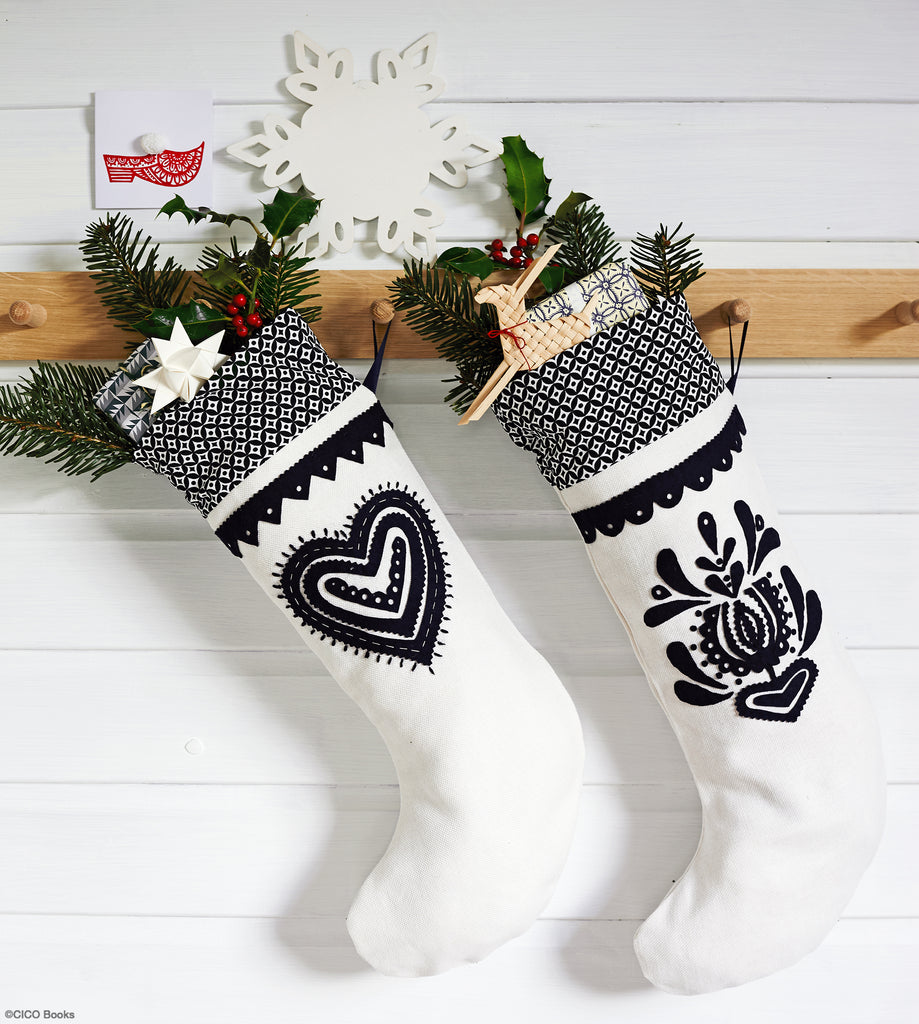
We all love Christmas, but if preparation for the big day is becoming a bit too hectic then it might be time to step back, set aside some time for yourself, and enjoy a few hours of mindful crafting. Wrapped carefully in tissue and put away after the holiday season is over, this stocking can come out year after year. The measurements and main instructions are for the heart motif stocking. The other stocking is worked in the same way—the small circles are made from the punched-out shapes from the hole punch. As in the heart motif, the holes in the centre of the flower motif start off bigger at the bottom and get smaller further up the sides.
 Photography by Joanna Henderson
 Photography by Joanna Henderson
You will need
Paper and pencil
Scissors
18½ x 24 in. (46 x 60 cm) main fabric (I used a heavyweight cream cotton)
Transfer paper for dark fabrics
9 x 9 in. (22 x 22 cm) navy felt
Pinking shears
Hole punch—I use an adjustable rotary hole punch
Needle and cotton sewing thread to match the felt
Six-stranded embroidery floss (thread) in navy and cream
Pins
6 in. (15 cm) ribbon, ½ in. (1 cm) wide)
8 x 16½ in. (20 x 42 cm) contrasting patterned fabric
1. Enlarge the template on page 126 to the correct size and cut the template out. Fold the main fabric in half, pin the template onto it, and cut out the shape to make the front and back of the stocking.
2. Trace out the design for the felt decoration. Because these will be cut from dark fabric, you will need to use transfer paper (see page 8 for more information about the different methods of transferring patterns to fabric).

3. Follow the instructions on your transfer paper or refer to my instructions and cut out the pieces from the navy felt, using pinking shears where there are small zigzag lines on the design. Put them to one side until needed.
4. Use the hole punch to punch the holes in the triangle border section and the center of the heart design. On the center piece of the heart design I have adjusted the size of the holes, starting with bigger holes at the bottom and changing to smaller sized holes toward the top. It isn’t essential, but if you have an adjustable hole punch, it adds to the detail.

5. Take the front section of the stocking and pin the felt pieces onto it, positioning the triangle border 1 in. (2.5 cm) from the top edge and the heart motif 1 in. (2.5 cm) below the border. Use dark navy cotton thread and small stitches all around the different sections to attach the felt pieces to the stocking.

6. Using two strands of cream embroidery floss (thread), stitch a line of running stitch around the center of the outer heart shape. Then complete a row of bullion knots (see page 11) all around the edge of the outer heart shape, spacing each knot about ½ in. (1 cm) apart.

7. Take the front and back of the stocking and with right sides together pin down the long side. Take the ribbon, fold it in half, and tuck it in, so that the loop is on the inside and the ends are aligned with the edges of the stocking. It should be positioned about ¾ in. (1.5 cm) down from the top edge. Sew down this straight side, with a ½ in. (1 cm) seam allowance, stopping when you get to the beginning of the curve.

8. Lay the stocking down so that it is opened out, flat. With right sides together, pin the rectangle of contrasting fabric to the top edge of the joined stocking pieces. Sew along this edge with a ½ in. (1 cm) seam allowance.

9. With right sides together, fold the stocking in half, so that the front and back align. Continue the line of stitching from where you stopped at the curve and stitch all around the stocking and up the other side seam, continuing the stitching to join the contrasting border fabric too.

10. Turn over a ½ in. (1 cm) hem all along the top edge of the border piece and press. Fold over the border fabric so that the hem comes to just below the seam that joins the border to the main stocking fabric. Secure in place by stitching all around with small hand stitches.

11. Turn the stocking The right way out and press.
Take a moment...
Felt is a wonderful material as it doesn't fray, which is very useful. Using the hole punch is a simple, satisfying activity, and can be calming if you're feeling a bit stressed by the holiday season.
This project is from The Mindful Maker by Clare Youngs. To get more fab blog posts like this one - direct to your inbox - be sure to sign up to our mailing list here.